Yucca Paleo Pizza Crust

Posted on April 26, 2015

I’ve spent a lot of time this week thinking about the Yucca. I never paid much attention to this odd looking root before, but suddenly, it seems to be appearing everywhere. I have already tried my hand at making yucca fries (recipe coming soon), and wanted to see what else this versatile starch could do.

For those of you who don’t know what yucca is (you are not alone) it is the root of the Cassava plant. Considered in the tuber family, this root is definitely a high source of carbohydrate (so should be eating in small quantities for those of you on a low carb diet – or doing a Whole 30). It can be used as a substitute for white potatoes when making french fries, and when powdered makes an excellent flour substitute. Though it may be a high-carb ingredient, this root also contains a significant amount of Vitamin C, Calcium, and various B-rich nutrients (Thiamine, Riboflavin and Niacin). This means that even if you are going to be splurging on a carbohydrate, you will still be getting some essential vitamins and nutrients needed for important things like concentration and cardiovascular health. More popularly, the yucca root is also the basis for tapioca!

IMG_0541
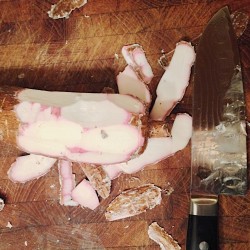
Preparing the yucca root is not a simple process. The skin is not edible, and actually contains small amounts of arsenic. If you want to prepare the root for consumption, you need to peel away the root’s waxy skin and boil it before doing anything else. Though it does take effort, once you have done this a few times, it can be a fairly quick and simple process. If you really don’t want to have to deal with that part of the process, you can also purchase canned yucca in the South American food section of some grocery stores, and occasionally can find it in the frozen food section.

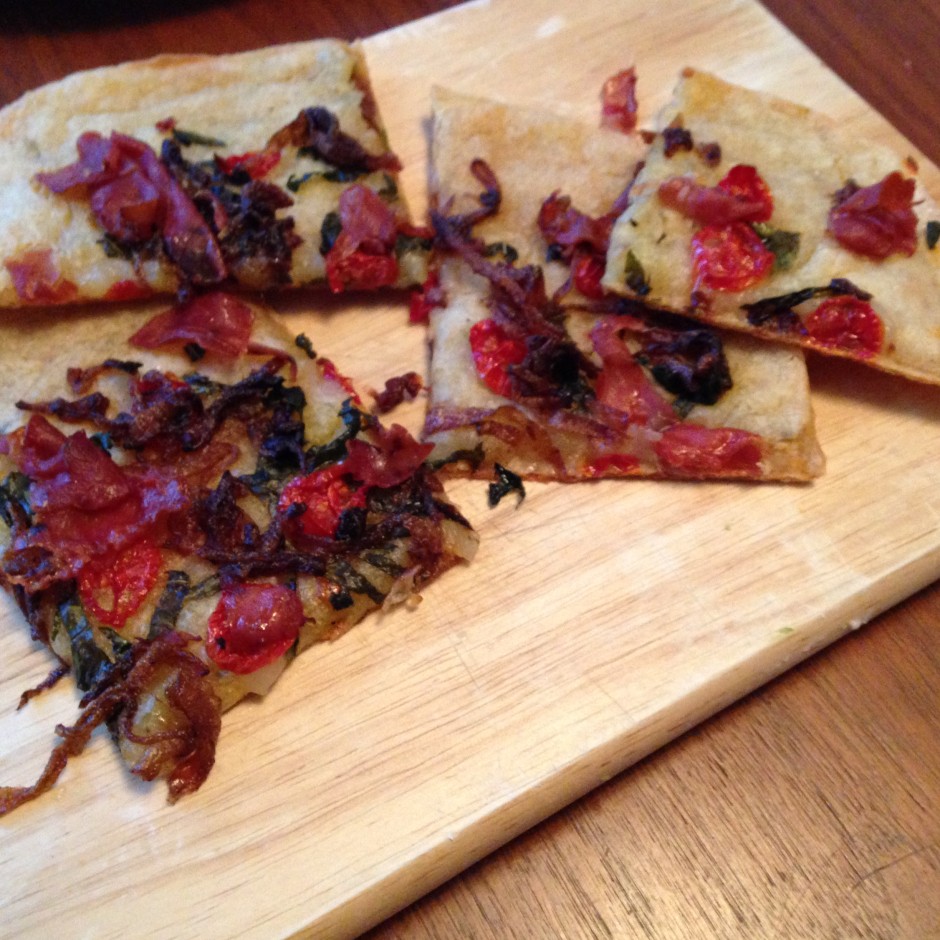
Given how time consuming the root can be to prepare, I was surprised to hear more and more people talking about this strange looking tuber. I started doing some googling, and found some amazing recipes using yucca – but the one that caught my eye was a recipe for Pan de Yucca. Pan de Yucca is a Columbian cheese bread, and naturally gluten free. I read several recipes, and finally decided I wanted to make a paleo version of this bread, and use it as the basis for a paleo pizza crust. Obviously, using cheese wasn’t an option, so I substituted in nutritional yeast. It took a few attempts (a.k.a. epic failures) but once I got used to working with the yucca as a dough, the end result was delicious.

How to prepare Yucca (for almost any recipe):

  1. Cut and peel the Yucca root. To do this you will need a . I tried this a few times, and for me it worked best to cut the Yucca up into small sections first, and then remove the waxy skin.
  2. Quarter the “peeled” yucca pieces and place them in boiling water for 20 minutes (or until fork tender).
  3. Remove the fiberous “core” from the Yucca. You will notice that there is a stringy and dense tendril that runs through the yucca. This core, though edible, is very tough, and is best removed from the yucca to make it more easily eaten. If you got a particularly large yucca, you may notice that this core has become more like a bamboo reed than a string. It is most easily identified after the yucca has been boiled. Once removed- your yucca is ready!

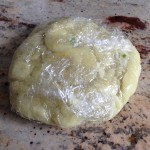
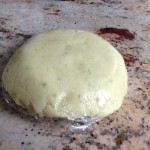
For this recipe, I needed to turn the boiled yucca into a dough. Full instructions are below, but I wanted to highlight that this dough when first prepared will basically be glue, and almost completely unworkable. Don’t worry, this is completely normal. Once the yucca “paste” has had the chance to cool, you will be able to work this into a much more manageable dough with a few simple steps.

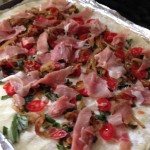
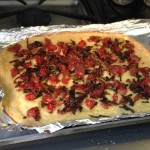
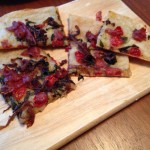
After the dough has been prepared, you can top this pizza with whatever toppings suite your fancy! I topped mine with fresh chopped basil, caramelized onions, cherry tomatoes and pieces of prosciutto. It was delicious!!! The crust wasn’t a typical crust (still had a potato-y texture), but it held up beautifully under the weight of all the toppings with a crunchy outer layer and fluffy interior. I can’t wait to try this with other topping combinations.

Yucca Paleo Pizza Crust

Yucca Paleo Pizza Crust

Thin and crispy crust - perfect for satisfying that pizza craving!

Ingredients

  • 1 large yucca root
  • 4-5 tablespoons (plus more for dusting)
  • 3 tablespoons
  • 1 tablespoon chopped chives (optional)
  • (for greasing hands and pan)
  • 2 tablespoons Extra Virgin Olive Oil

Instructions

  1. Cut your yucca into manageable "chunks" (I typically cut the root into 4-5 sections). Once you have these pieces cut, use your knife to peel off the thick waxy skin, exposing the white flesh beneath. You can quarter the yucca "disks" into wedges at this point, to help them cook faster, but that is optional.
  2. Boil the yucca in a large pot for about 20 minutes, or until fork tender.
  3. Once you have drained the yucca and set it on a cutting board, remove and discard the fibrous core. Add the boiled yucca to your blender with the chopped chives and . Puree until smooth (this shouldn't take long).
  4. Line a large bowl or casserole dish with clear plastic wrap. Using a spatula, scoop out the yucca mixture into the plastic wrap lined bowl. The yucca puree will be VERY sticky (almost like glue). If you are having trouble with it sticking to your hands, coat them in a bit of (this will also help moisturize dry hands and cuticles!). Wrap the dough up in the plastic wrap, and place in the refrigerator to cool. You can keep the dough in the fridge for up to one day, or just for 30 minutes.
  5. Once the dough is cooled, remove it from the fridge. Preheat your oven to 375 degrees. Grease your hands again, and remove the dough from the plastic wrap, placing in your large bowl. Adding the one tablespoon at a time, gently knead the dough until it is no longer overly sticky (for me this is normally only 4-5 tablespoons).
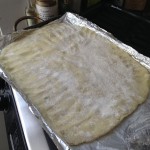
  6. Line a large baking sheet with tin foil. Grease the foil with palm shortening, and sprinkle on a light layer of . Put the dough on the foil, and (using your hands or a rolling pin) flatten the dough out until it is about 1/4 inch in thickness.
  7. Add your pizza toppings. Using a pastry brush (or your fingers), lightly grease the edges of the pizza with the olive oil. This will let your outer crust look less dry and get a nicer golden brown. Any excess oil at the end can be drizzled over the rest of the pizza.
  8. Cook Pizza at 375 for 50-60 minutes. The crust will be a light golden brown and feel firm on the outside with a slight softness in the center.
  9. Cut and serve hot!
Schema/Recipe SEO Data Markup by Yummly Rich Recipes
https://www.urbancavewoman.com/recipes/entrees/yucca-paleo-pizza-crust/

Asian Cucumber Salad

Posted on April 18, 2015

The other day we were invited to a cookout on our friends roof, and we were asked to bring a side salad. I knew we would be having lots of pretty rich meat, and most likely some other non-paleo snacks, so I wanted to come up with a salad that was tasty and light to counter all of the other temptations I knew would be there. For a while, I’ve been tossing around a few ideas for a twist on coleslaw, and this seemed like the perfect opportunity to give it a try.

There are two schools of thought when it comes to coleslaw: mayo dressing and a sweet vinegar dressing. Personally, I have always preferred the vinegar version of coleslaw. These types of slaw dressings are normally filled with equal parts cider vinegar to refined sugar – so not exactly a healthy alternative to the creamy mayo version. I knew there had to be a way to recreate this type of flavor, without all of the sugar. Instead of using raw white, refined sugar, I decided to try using maple syrup, and it really worked out well. To “mix it up” I threw in some fresh grated ginger, and the dressing ended up having a really full bodied taste with an Asian twist.

After nailing the dressing, I went to put together the slaw. One problem though, our local grocery only had red cabbage, but no regular. However, they had some gorgeous English Cucumbers. Deciding to live on the edge, I ended up using our spiralizer to make cucumber noodles, and threw in some diced red pepper just to give it some nice color. Though not the coleslaw I had intended, this ended up being a light, crunchy side salad with a ton of flavor. Sometimes accidents end up being some amazing discoveries – we will definitely be bringing this to a lot more cookouts this spring!

Shopping Notes:
If you are looking for a really great spiralizer, I use the Paderno model, available on Amazon here: Paderno World Cuisine A4982799 Tri-Blade Plastic Spiral Vegetable Slicer

Asian Cucumber Salad
Light and tangy salad - great for cookouts!
Write a review
Print
For the Salad
  1. 1 English Cucumber (made into "noodles" with a spiralizer)
  2. 1/3 cup Purple Cabbage (shredded for coleslaw)
  3. 1/2 Red pepper (diced)
For the Dressing
  1. 1/2 tsp Fresh Grated Ginger
  2. 1/4 cup Apple Cider Vinegar
  3. 1/4 cup Maple Syrup
  4. 1 tbsp Olive Oil
  5. Pinch of Salt
For the dressing
  1. In a wide mouth mason jar, assemble all of the ingredients for the dressing. Using an immersion blender, blend until smooth.
For the salad
  1. Assemble the cucumber, cabbage and peppers in a large bowl. Toss with dressing 1/2 cup of the dressing (more to taste if you prefer). Chill in the fridge for several hours before serving.
Notes
  1. Serve the salad chilled, it can be made a day ahead of time. This salad actually starts to taste better if it has been marinating for a while.
Equipment
  1. Spiralizer
  2. Immersion Blender
Urban Cavewoman https://www.urbancavewoman.com/

Plantain Pancakes

Posted on April 12, 2015

One of my favorite things to do on Sunday is to get up and have a great, relaxing breakfast. During the week, breakfast is normally rushed and perfunctory, but weekend breakfasts allow time to enjoy the food and the company. Ever since learning to poach an egg, we have been enjoying them for almost every breakfast. As wonderful as poached eggs are, I wanted to try something different. Maybe, something a little more decadent.

In my “pre-gluten-free” days, one of my favorite things for breakfast was a stack of pancakes. To be honest, I loved pancakes so much, that I would eat them for dinner sometimes. Since going gluten free, I have experimented with many different incarnations of gluten-free pancakes, and none of them quite lived up to my hopes. I’ve tried rice flour pancakes, GF Bisquick, Glutino… all of them. Since going paleo, it has become even more difficult to find a good, indulgent, pancake. However, I think I have finally figured out the secret to the perfect paleo pancake. Plantains.

I LOVE cooking with Plantains. They are a great substitute for anything that needs a “dough”. Though they have a mild flavor, they can be used for both sweet and savory baking. There are several versions of the Plantain pancake out there, but many of them tasted too “eggy” to me, and few got a nice fluffy texture. It took some experimenting, but here is my recipe for a PERFECT paleo pancake.

Shopping Notes:
We use an electric griddle for our pancakes, and I really recommend it. The extra surface area (compared to a pan) means that we can cook more pancakes at once, and that way the first set won’t be cold by the time we have done the full batch. We have a full size electric griddle, but Amazon sells a smaller sized one as well: Presto 07211 Liddle Griddle

This recipe uses Cassava Flour to help bind the batter, a flour made from Yucca root. You could substitute Tapioca flour for this if you can’t find Cassava in your local grocery store (same product), or you can purchase Cassava flour on Amazon: Cassava Flour (32oz) By Choice

Plantain Pancakes
Fluffy and satisfying pancakes.
Write a review
Print
Ingredients
  1. 4 Eggs
  2. 2 Green Plantains
  3. 2 tsp Vanilla Extract
  4. 3 tbsp Palm Shortening
  5. 2 tbsp Cassava Flour
  6. 1/2 tsp baking soda
  7. Shortening for griddle to cook with.
Instructions
  1. Peel and cut the plantains into small pieces.
  2. In a blender, combine all ingredients. Blend until smooth.
  3. Grease the electric griddle with some palm shortening. Spoon out the pancake batter onto the griddle (I used a 1/4 measuring cup for this, and it was the perfect size). These pancakes won't cook like normal pancakes. You may start to see bubbles on some of them, but the way you know to flip them is that the top surface of the pancake batter starts to look very smooth. The pancakes seemed to be done in 3-4 minutes per side.
Notes
  1. Serve hot with ghee and maple syrup. They taste great with a side of crispy bacon.
Equipment
  1. Electric Griddle
  2. Blender
Urban Cavewoman https://www.urbancavewoman.com/

A Perfect Spring Dinner

Posted on April 6, 2015

I don’t know how things are in your family, but in mine, the holidays are about two things: 1) Lots of GOOD food, and 2) Not killing each other; literally. My family has more food allergies than I can keep track of, so the likelihood of someone getting sick or breaking out in hives at a family dinner is shockingly high! Though the list is constantly expanding, we currently have allergies to strawberries, nuts, peanuts, coconut, dairy, shellfish, sesame and chickpeas. Top it all off with my being a Celiac and cooking for this crew has basically become a real life version of Mine-Sweeper… you never know when someone will blow up.

Each year before a holiday approaches, we begin the menu planning process, normally with a group text to confirm all existing allergies and check to see if there are any new ones, and then put on our thinking caps. Just because we are limited with our ingredients, doesn’t mean the food can’t be delicious. Luckily, none of us have given up meat (yet) – so it was easy to decide to make protein the star of the dinner.

Seeking inspiration, we started watching the Food Network, and happened upon an episode of Giada making a spring leg of lamb. I have never tried doing a stuffed leg of lamb, but it looked so delicious we had to give it a try. We made several changes to this dish, both for our allergies, and to make this more paleo friendly. First, we did away with the nuts (obviously). We loved the idea of a crunch, so we opted to add a crisp apple into the mix. Second, we don’t like raisins, and they could be a bit sweet for our taste, so we substituted some dried cranberries. This was a great balance to the dish, adding a nice tartness.

The original recipe had a panko Gremolata. Now, I have to be honest. I had NO idea what a Gremolata was until i Googled it. Basically, it is a fancy term for chopped herbs with lemon zest and parsley. This actually sounded amazing, but sadly would not work for our diets. Instead of panko I used one of my FAVORITE paleo substitutes – pork dust. Pork dust is basically chopped up organic pork rinds, and it is delicious. Whenever you substitute pork dust for panko, you have to remember that the pork dust has more fat and sodium in it, so I typically will remove or reduce whatever oil and salt is called for in the original recipe.

As is typical for any dinner my husband and I prepare together, we ended up pulling an audible during preparations. My husband had grabbed some thick slab bacon from the butcher earlier that day, and was looking for an excuse to use it. This translated to him chopping some of it up and throwing it in the pan while I was preparing the stuffing. I was worried it would be a bit “too much,” but it ended up adding some really good flavor. Also, when we were cooking we were worried the lamb would dry out, so we added some balsamic, wine and lemon juice to the pan before throwing it in the oven. When we took the lamb out, there was so much goodness in the pan, we had to make a gravy. Though this wasn’t in the original plan, it was delicious!

For a first attempt at a stuffed leg of lamb, we were VERY pleased. I’m glad we ended up buying a big ball of the kitchen twine, because we used way more than Giada did on her show. Our lamb ended up tearing during the rolling, so we tried to keep the stuffing in place with more twine. We seared the torn side first, and it helped to keep the whole lamb from coming undone. We also tied the lamb both lengthwise and width-wise, so it was very secure. Note, this recipe did use wine, so it isn’t 100% paleo. If you are being very good, you can always substitute the wine with either more balsamic, or some broth and that should work.

All in all, this turned out to be a very successful family dinner.The lamb was cooked perfectly, and was absolutely delicious. Everyone appeared to enjoy the dinner, and almost everyone went for seconds. The only downside? Not enough leftovers!

Shopping notes:

Interested in Pork Dust? You can find it at Amazon here: Pork Dust – Pork Rind Breadcrumbs (Pack of 3)

For Arrowroot flour, I like to use Bob’s Red Mill: Bob’s Red Mill Arrowroot Starch Flour, 16 oz

IMG_0064 IMG_0084

IMG_0104 IMG_0094

Spring Stuffed Leg of Lamb
Serves 10
Stuffed leg of lamb, perfect for large gatherings.
Write a review
Print
Prep Time
40 min
Cook Time
1 hr 20 min
Total Time
2 hr
Prep Time
40 min
Cook Time
1 hr 20 min
Total Time
2 hr
For the Lamb
  1. One 5-pound trimmed and boned leg of lamb, butterflied
  2. One package baby spinach (about 5 oz)
  3. 1/3 cup dried cranberries
  4. 1 granny smith apple, chopped
  5. 2 sprigs fresh rosemary
  6. 2 sprigs fresh sage
  7. 6 cloves of garlic
  8. 1/2 cup whole-grain mustard
  9. 3 thick slabs hand-cut bacon, chopped (you can also use Pancetta)
  10. 1/3 dry white wine
  11. 3 Tablespoons Balsamic Vinegar
  12. Juice from 1/2 lemon
  13. 1 1/2 Teaspoons kosher salt
  14. 1/2 teaspoon black pepper
  15. 1/4 teaspoon red pepper flakes
  16. Olive Oil for cooking
For the Gremolata
  1. 1/3 cup pork dust
  2. 1/3 cup fresh parsley, chopped
  3. zest of 1 lemon
For the Gravy
  1. 2 Tablespoons arrowroot flour
  2. 1/3 cup dry white wine
To prepare the lamb
  1. Take the lamb out of the fridge about 30-45 minutes before prep time.
  2. In a food processor, chop up the garlic, rosemary and sage. Heat up about 2 tablespoons of olive oil in a cast iron skillet over medium heat, and cook the herb and garlic mixture until fragrant. Add the chopped bacon and red pepper flakes to the pan until it starts to brown. Add in the spinach and 1/2 teaspoon of salt until spinach starts to wilt. Add in the cranberries and apple, cooking for another 3 minutes, and then remove from heat.
  3. Preheat the oven to 350 degrees. Roll out the lamb, and pound it to an even thickness (about 1 inch). Sprinkle with the pepper and 1/2 teaspoon of salt. Spread the mustard on the lamb, distributing evenly, and then top with the spinach mixture. Starting at one end, roll the lamb up and secure with cooking twine. Our lamb ended up tearing, but we just used some extra twine and it was fine. Sprinkle the remaining salt on the outside of the lamb.
  4. Wipe down the skillet lightly, and set over a high flame. Add about 1-2 tablespoons of oil to the pan and let it heat up. Carefully (using a good set of tongs) sear the lamb on all sides (about 3 minutes per side). Once it has been seared on all sides, pour the wine, lemon juice and vinegar over the lamb, and place in the oven to cook. The roast should take about 1 hour 15 minutes to cook fully. It will be ready when it reads 135 degrees on your thermometer. Let it rest for 15 minutes before slicing and serving.
For the Gremolata
  1. When the lamb is finished cooking, take a small skillet and heat it over a medium flame. Add in the pork dust, lemon zest and parsley. Using a wooden spoon, stir the mixture until it starts to brown. Remove from heat and reserve the crumbs to be dusted over the lamb before serving.
For the Gravy
  1. While the lamb is resting, take the skillet (this will be very hot from the oven still, so be careful) and put it over a medium flame. Using a whisk, add the wine to the drippings from the pan with about 2 tablespoons of arrowroot flour. You may need more or less depending on how much "drippings" you have, so do this slowly until the gravy reaches your desired thickness. For thicker gravy, add more flour, to thin it out, add more wine or use some broth or water.
Notes
  1. Serve the lamb while still hot, sliced on a platter. Top with the Gremolata and serve gravy on the side. This will really serve about 12 people, but you want to make sure you have enough for seconds - trust me your guests will thank you.
Equipment
  1. Cast iron skillet
  2. Kitchen twine
  3. Meat Thermometer
  4. Food Processor
Adapted from Giada de Laurentiis
Urban Cavewoman https://www.urbancavewoman.com/
Back to top